Your cart is currently empty!
Theme Settings Overview
By ·
Using the WordPress Customizer, you can edit your child theme’s options and preview your changes before publishing them to your live site.
Once you’ve activated a child theme, you’ll see several default WordPress settings and some Genesis-specific settings in the customizer. The available settings will vary depending upon which child theme is activated.
To get started, go to Appearance > Customize to access the customizer:

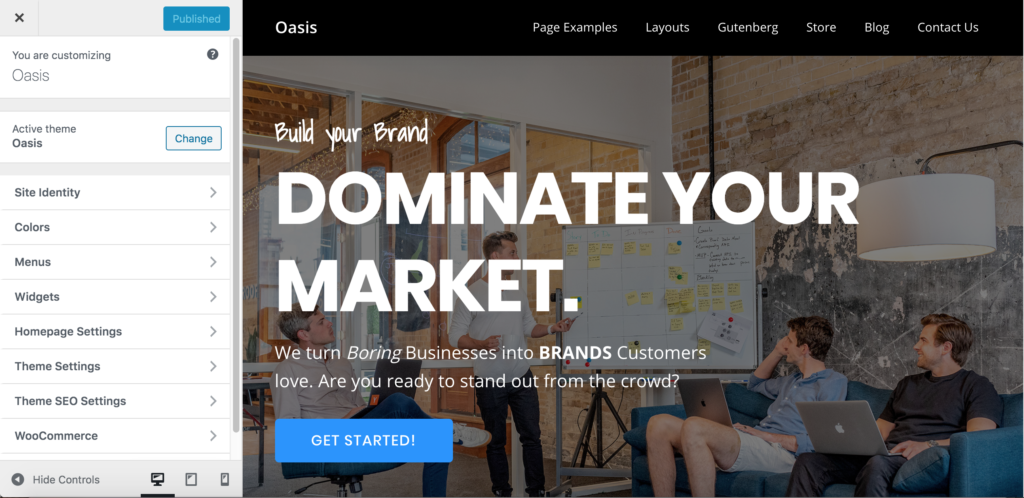
Once the customizer is open, you’ll see a menu on the left and a preview of your site on the right, as shown below.

- Customizer Menu: On the left side of the screen, you’ll see the customizer menu which shows the various options that are available for editing in your theme. The exact options available depend upon which theme you’ve activated. To see the settings available within each option, click the title to open the expanded view.
- Live Preview: On the right side of the screen, you’ll see a live, interactive preview which allows you to test each option in your theme. All changes will appear as you select them, but they will not be applied to your site until you click Publish.
- Hide Controls: To hide the customizer menu and see the interactive preview in full screen mode, click the Hide Controls triangle in the lower left corner of the menu panel.
- Device Icons: To see the interactive preview in various device widths, click the device icons in the lower right corner of the menu panel.
- When you are finished making all your changes, click the Publish button. If you decide you do not want to save the changes you’ve made, click the X located to the left of that button to close the editor and dismiss your changes.
Learn how to customize the settings for your Theme.
